


Are you looking to enhance your aerial photography skills? In this article, we will explore the world of photo editing for aerial shots, uncovering tips and techniques to help you polish your images to perfection. From adjusting colors and contrast to removing unwanted distractions, we will guide you through the process step by step. So grab your camera and get ready to take your aerial shots to new heights with the power of photo editing.
Understanding Aerial Photography
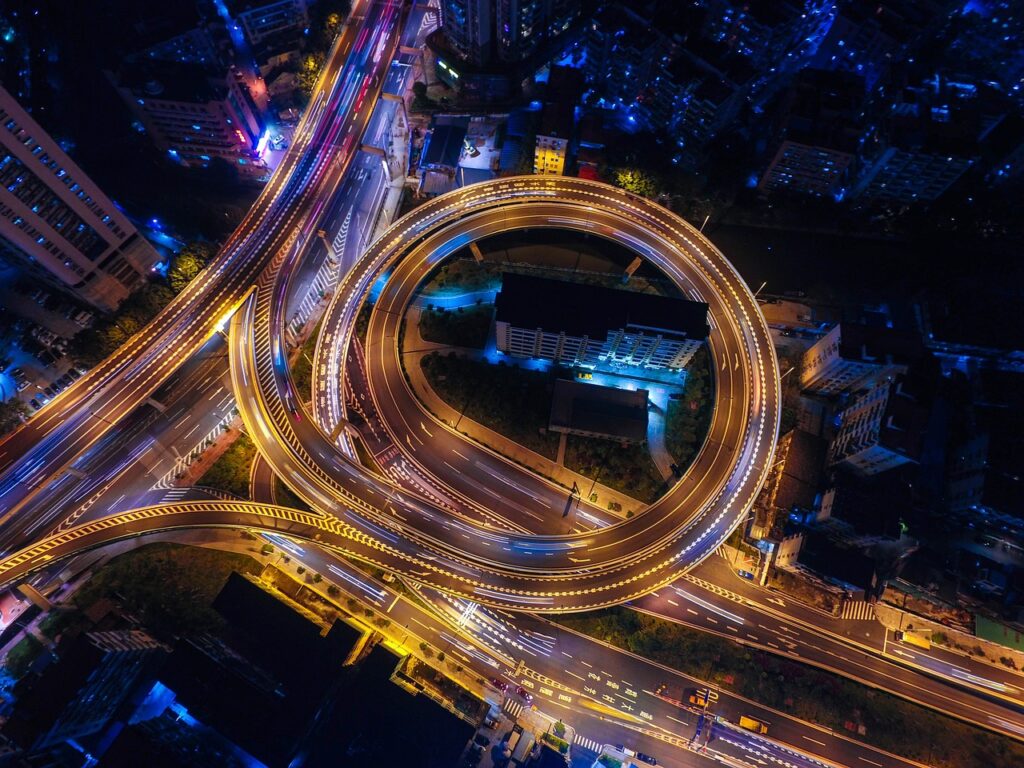
Aerial photography is the art of capturing images from an elevated perspective using cameras mounted on aircraft, drones, or other high vantage points. It offers a unique and captivating view of the world, allowing you to see landscapes, buildings, and objects from a completely new angle. Aerial photography has a rich history and has become increasingly important in the field of photography.
History of Aerial Photography
Aerial photography dates back to the mid-19th century when photographers began experimenting with capturing images from hot air balloons and early aircraft. The first documented aerial photograph was taken by French photographer Nadar in 1858. Over the years, advancements in technology led to the development of more specialized cameras and equipment, making aerial photography more accessible.
Importance of Aerial Shots in Photography
Aerial shots bring a fresh and unique perspective to photography. They allow you to showcase the scale and beauty of landscapes, highlight the architecture of buildings, and capture images that would otherwise be impossible or difficult to obtain. Aerial photography is widely used in various industries such as real estate, tourism, journalism, and environmental monitoring. It has also gained popularity among hobbyist photographers looking to explore their creativity from a new vantage point.
Key Elements of a Great Aerial Shot
To capture stunning aerial shots, you need to pay attention to several key elements. These elements include composition, lighting, focus and sharpness, and colors and contrast. Understanding how these elements work together will help you create visually pleasing and impactful images.
Composition
Composition plays a crucial role in aerial photography. It involves arranging the various elements within the frame to create a visually balanced and engaging image. When composing aerial shots, it’s important to consider the rule of thirds, leading lines, and the overall balance of the scene. Experimenting with different compositions can yield unique and visually striking results.
Lighting
Lighting is one of the most important aspects of any form of photography, and aerial photography is no exception. The quality and direction of light can significantly affect the mood and overall impact of your aerial shots. Ideally, photographing during the golden hours of sunrise and sunset can create warm and soft lighting that adds depth and dimension to your images. However, aerial photography also opens up the opportunity to capture stunning shots with unique lighting conditions such as shadows and patterns created by clouds.
Focus and Sharpness
Achieving sharp focus is essential in aerial photography to ensure that your subject or the entire scene is crisp and well-defined. Depending on the depth of field you want to achieve, you may need to adjust your camera settings and select an appropriate aperture. Paying attention to autofocus settings and using manual focus when necessary can help you capture sharp and detailed aerial shots.
Colors and Contrast
Colors and contrast are crucial elements that can greatly enhance the visual impact of your aerial shots. Aerial photography often offers vibrant and unique color palettes, especially during sunrise and sunset. Capturing these vivid colors and enhancing the contrast in post-processing can bring out the beauty and drama of your images. Adjusting the color temperature and using graduated filters can also help balance the exposure and create a cohesive look.

Choosing the Right Editing Software
Once you’ve captured your aerial shots, editing them is the next step in the process. Choosing the right editing software can greatly influence the outcome of your final images. There are several popular editing tools available, each with its own unique features and capabilities.
Adobe Photoshop
Adobe Photoshop is a powerful and versatile editing software widely used by professional photographers. It offers a wide range of tools and features for retouching, color correction, and manipulation. Photoshop allows you to make precise adjustments to your aerial shots, whether it’s removing unwanted objects, adjusting exposure, or creating stunning composite images.
Lightroom
Adobe Lightroom is another popular editing software that offers a streamlined workflow and powerful editing capabilities. It is particularly well-suited for organizing and batch editing large collections of photos, making it a favorite among aerial photographers. Lightroom provides a variety of tools for enhancing colors, adjusting exposure, and fine-tuning your aerial shots.
Capture One
Capture One is a professional-grade editing software that offers excellent image quality and advanced editing tools. It is known for its exceptional color grading capabilities, making it a preferred choice for photographers looking to achieve precise and vibrant colors in their aerial shots. Capture One also provides extensive options for cataloging and organizing your photos.
GIMP
GIMP (GNU Image Manipulation Program) is a free and open-source editing software that offers many of the features found in commercial software. While it may have a steeper learning curve compared to other programs, it provides a cost-effective option for photographers on a budget. GIMP offers a wide range of tools for editing, retouching, and manipulating aerial shots.
Other Editing Tools
Apart from the aforementioned editing software, there are numerous other tools available for editing aerial shots. Some popular options include Affinity Photo, DxO PhotoLab, and Corel PaintShop Pro. These tools provide various features and functionalities to cater to different editing preferences and requirements.
Basic Editing Techniques for Aerial Shots
Once you have selected an editing software, it’s time to dive into the editing process. There are several basic editing techniques that can help enhance your aerial shots and bring out their full potential.
Cropping and Straightening
One of the first steps in editing aerial shots is to crop and straighten the image if necessary. Aerial photos may suffer from perspective distortions or uneven horizons, especially when captured from higher altitudes. Cropping can help to remove any distracting elements and create a more pleasing composition, while straightening can correct any tilted or skewed perspectives.
Adjusting Exposure
Exposure adjustments are often necessary to ensure that your aerial shots have the desired brightness and tonal range. Depending on the circumstances of the capture, you may need to adjust the overall exposure, highlights, shadows, and contrast to achieve the desired look. Be careful not to overexpose or underexpose the image, as this can result in loss of detail or a lack of tonal range.
Enhancing Contrast and Colors
Aerial shots can benefit from enhanced contrast and vibrant colors to create a visually appealing image. Adjusting the contrast can add depth and dimension to the scene, while selective adjustments to saturation and vibrance can help bring out the natural colors of the landscape. Utilizing graduated filters or adjustment brushes can also allow you to make local adjustments, enhancing specific areas of your aerial shots.
Sharpening and Noise Reduction
To ensure that your aerial shots appear sharp and noise-free, it is important to apply appropriate sharpening and noise reduction techniques. Sharpening enhances the details and improves the overall clarity of the image, while noise reduction helps reduce the unwanted grain or noise that may be present, especially in low-light conditions. Finding the right balance between sharpness and noise reduction is crucial to maintain the quality of your aerial shots.
Aerial Shots
Advanced Editing Techniques for Aerial Shots
Beyond the basic editing techniques, there are more advanced techniques that can elevate your aerial shots to the next level. These techniques allow you to correct distortions, remove unwanted objects, replace skies, and add filters and effects to transform your images.
Perspective Correction
Aerial shots may suffer from perspective distortions due to the angle of capture. Perspective correction techniques can help correct these distortions and create a more natural-looking image. Tools such as the perspective crop tool or the transform command in editing software can be used to straighten verticals and correct converging lines.
Removing Unwanted Objects
Unwanted objects can sometimes find their way into your aerial shots, distracting from the main subject or the overall composition. Advanced editing techniques like content-aware fill or clone stamping can be used to remove these objects seamlessly. Careful attention to detail and blending techniques is important to ensure a natural and seamless result.
Sky Replacement
Changing the sky in your aerial shots can completely transform the mood and impact of the image. In cases where the original sky lacks interest or is overexposed, sky replacement techniques can be employed. Utilizing the selection tools and layers in editing software, you can isolate the original sky and replace it with a more visually compelling alternative.
Adding Filters and Effects
Applying creative filters and effects can further enhance the visual appeal of your aerial shots. Techniques such as graduated filters, vignettes, or color grading can be employed to add drama, warmth, or a specific mood to your images. Experimenting with different filters and effects can help you achieve a unique and personal style in your aerial photography.
Retouching and Cleaning up Aerial Shots
Aerial shots often suffer from imperfections such as sensor spots, lens flare, dust, and scratches. Retouching these imperfections is essential to produce clean and professional-looking images. Several retouching techniques can be employed to clean up your aerial shots and ensure a pristine final result.
Removing Sensor Spots and Lens Flare
Sensor spots and lens flare can detract from the overall quality of your aerial shots. Sensor spots, caused by dust particles on the camera sensor, may appear as small dark spots in your images. Lens flare, on the other hand, occurs when the strong sunlight hits the lens and causes unwanted artifacts or haze. Utilizing the spot healing brush or clone stamp tool, you can easily remove sensor spots and lens flare while preserving the integrity of the image.
Dust and Scratch Removal
When capturing aerial shots, dust particles or scratches on the camera lens or filters can sometimes make their way into the images. Dust and scratch removal techniques can help eliminate these imperfections and ensure a clean and blemish-free final result. The spot healing brush or the clone stamp tool can be used to carefully remove these small imperfections and create a seamless image.
Clone Stamp and Healing Brush
The clone stamp tool and the healing brush tool are essential for retouching and cleaning up aerial shots. These tools allow you to remove unwanted elements or blemishes from the image by covering them with pixels from a nearby area. Whether it’s removing power lines, distracting elements, or enhancing certain areas of the composition, these tools provide precise control over retouching and clean-up tasks.
Working with HDR and Panorama Shots
Aerial photography provides ample opportunities for capturing high dynamic range (HDR) images and stunning panoramas. HDR images combine multiple exposures to capture an extended tonal range, resulting in a more detailed and visually impactful image. Panoramas, on the other hand, stitch together multiple images to create an expansive and immersive view of the landscape.
Creating High Dynamic Range Images
To create HDR images, you need to capture a series of exposures at different settings – typically bracketing the shots. HDR software or the merge to HDR function in editing software can then be used to blend the different exposures and create a final image with an extended tonal range. This technique is particularly useful for aerial shots that feature a wide range of highlights and shadows, such as landscapes during sunrise or sunset.
Stitching Panoramas
Panoramas are created by capturing a series of overlapping images and merging them together to create a wide-angle view of the scene. Aerial photography offers a unique opportunity to capture stunning panoramic shots, showcasing the vastness of landscapes from above. Dedicated panorama stitching software or the panorama merge function in editing software can be used to align and blend the images seamlessly, creating a cohesive and visually captivating panorama.
Exporting and Saving Aerial Shots
Once you have finished editing your aerial shots, it’s important to consider the appropriate file formats, compression settings, and metadata to ensure the highest quality output and protect your work.
File Formats and Compression
When exporting your aerial shots, it is essential to choose the right file format. The most commonly used formats for digital photography are JPEG and RAW. JPEG offers smaller file sizes and is widely supported, making it suitable for sharing or displaying your aerial shots online. On the other hand, RAW files retain the maximum amount of information and allow for greater flexibility in post-processing. When it comes to compression settings, consider striking a balance between file size and image quality, ensuring that the final output maintains the desired level of detail and sharpness.
Metadata and Copyright Information
Including metadata in your aerial shots is important for documentation, organization, and copyright protection. Metadata can include information such as camera settings, location, and copyright information. Adding copyright information helps establish your ownership of the image and can serve as a deterrent against unauthorized usage. Most editing software allows you to easily add and modify metadata during the exporting process.
Professional Tips and Tricks
Professional aerial photographers often employ various tips and tricks to streamline their editing workflows and achieve consistent and high-quality results. These tips and tricks can enhance your editing process and help you develop your personal style in aerial photography.
Batch Editing and Presets
Batch editing and presets are powerful tools that can save time and ensure consistency when editing multiple aerial shots. By applying the same set of adjustments or presets to a series of images, you can quickly achieve a cohesive look. This is particularly useful when processing images from the same aerial shoot or when working on a specific project.
Using Layers and Masks
Layers and masks allow for non-destructive editing and provide precise control over adjustments in aerial shots. By utilizing adjustment layers and masks, you can make selective edits to specific areas of the image without affecting the entire composition. This provides flexibility and the ability to fine-tune the details in your aerial shots.
Working with Raw Files
Working with RAW files gives you maximum control over the editing process, as they retain all the original data captured by the camera sensor. It allows for a greater degree of flexibility in adjusting exposure, white balance, and other parameters. With the ability to recover highlights and shadows, RAW files are particularly beneficial for aerial shots that may have challenging lighting conditions.
Non-destructive Editing
Non-destructive editing is a technique that preserves the original image file while allowing for extensive editing and adjustments. By utilizing adjustment layers, smart objects, or virtual copies, you can edit and experiment with different settings without permanently altering the original file. This ensures that you can always revert back to the original state of the image or make further adjustments in the future.
Finalizing and Sharing Aerial Shots
After completing the editing process, it’s time to review your edited aerial shots, resize or resample them if necessary, and prepare them for sharing or printing.
Reviewing the Edited Shots
Before sharing or printing your aerial shots, take the time to review them with a fresh pair of eyes. Check for any remaining imperfections, ensure that the composition is pleasing, and confirm that the color and tonal adjustments are consistent. Pay attention to small details such as sensor spots, dust, or artifacts that may have been overlooked during the editing process.
Resizing and Resampling
Depending on the purpose of your aerial shots, you may need to resize or resample them to fit specific dimensions or file size requirements. Resizing involves changing the overall dimensions of the image, while resampling adjusts the number of pixels per inch. Carefully consider the intended output and ensure that your aerial shots are resized or resampled to maintain their quality and clarity.
Printing and Framing
Printing your aerial shots allows you to showcase your work in a tangible and immersive way. Consider choosing high-quality printing services or professional labs that specialize in printing aerial photographs. Pay attention to paper selection, print finishes, and framing options to create a visually stunning and long-lasting presentation of your aerial shots.
Sharing on Social Media
Sharing your aerial shots on social media platforms allows you to reach a wider audience and receive feedback from fellow photography enthusiasts. Consider optimizing your images for each platform’s specifications to ensure the best viewing experience. Pay attention to image resolution, file size, and aspect ratios to maintain the visual impact and quality of your aerial shots.
In conclusion, understanding aerial photography and mastering the art of editing are essential for capturing breathtaking aerial shots. From composition and lighting to advanced editing techniques and finalizing your aerial shots, each step contributes to creating visually stunning images that captivate viewers. With the right tools, techniques, and a touch of creativity, you can polish your aerial shots to perfection and share your unique perspective with the world.